Scaniverse Review: Free 3D Laser Scans with Your iPhone
Since Apple added LiDAR Scanners to the iPhone 12 Pro, it’s possible to generate 3D Scans with your phone. That’s spectacular, isn’t it?
But with so many apps in the App Store, how do you actually pick the best one for your use-case?
Scaniverse is a great option and my personal favourite!
So in this post, we’ll show, how to use the Scaniverse app on your iPhone or iPad to generate great 3D laser scans and all features it has.
So, let’s get into it. 🚀🚀
What is Scaniverse?
Scaniverse is an app for the iPhone and iPad that allows you to make 3D scans. This is possible due to the LiDAR Scanner that Apple added to the iPhone 12 Pro, iPhone 12 Pro Max, iPhone 13 Pro, iPhone 13 Pro Max and the iPad Pro versions.
Let’s have a quick look at what 3D laser scanning is in general:
3D scanners capture the x, y and z coordinates of many points on surfaces of objects. These points are then rebuilt in an 3D space and visualize the physical object that was scanned.
Let’s look at an example. I made a scan with Scaniverse of a steel beam.
OK, I didn’t have enough space to capture the backside of the beam and the lighting conditions were pretty bad. That’s probably the reason why the end of the beam isn’t as accurate.
But hey, especially the beginning of the beam is super accurate. Isn’t that impressive that we are able to do that with our phones?!
You see, I am very excited about this.
But now, I am gonna show you step-by-step how to do your first 3D scan with your iPhone.
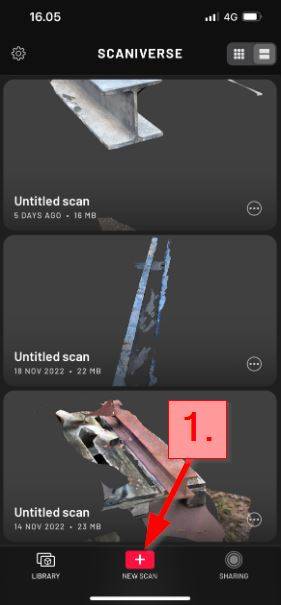
How To Make Your First 3D Scan
- Open the Scaniverse App and click on the + New Scan Button in the bottom
2. Choose the Scan Size
- Small Object for small objects
- Medium Object for objects like people or furniture
- Large Object / Area for rooms, buildings, outdoor spaces
3. Click on the red 🔴 button to start recording. In the video below, I show you how to scan a room. It’s quite easy.
You just need to scan all red areas. Once there are almost no red areas any more, the scan is basically done.
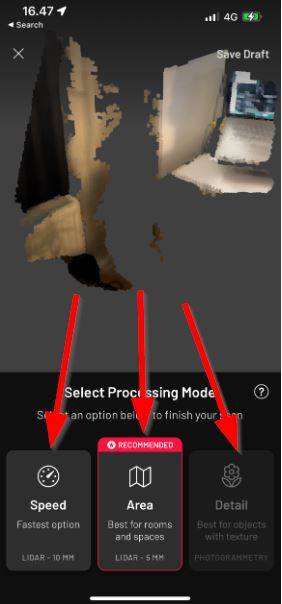
4. Select the Processing Mode: Speed, Area or Detail mode
5. Export the point cloud to the preferred file type: Click on Share >> Export Model >> Select one of the many file formats.
Alright, so now let’s have a look at the result AND keep in mind that the whole scan took less than 2 minutes.
Now, small objects are not too accurate. However, when scanning rooms, our main interest is usually to generate a floor plan or measure the dimensions.
And for that, the point cloud is definitely accurate enough! What do you think? Let us know in the comments below. ✍️
Further down the article, we’ll also look at pros and cons of Scaniverse.
Features
1. Cropping & Rotating
Scaniverse allows us users to edit the 3D scans within the app.
One great feature is cropping. When laser scanning, the device will always scan objects that you are not interested in.
In my example of the steel beams, the surroundings were often captured as well.
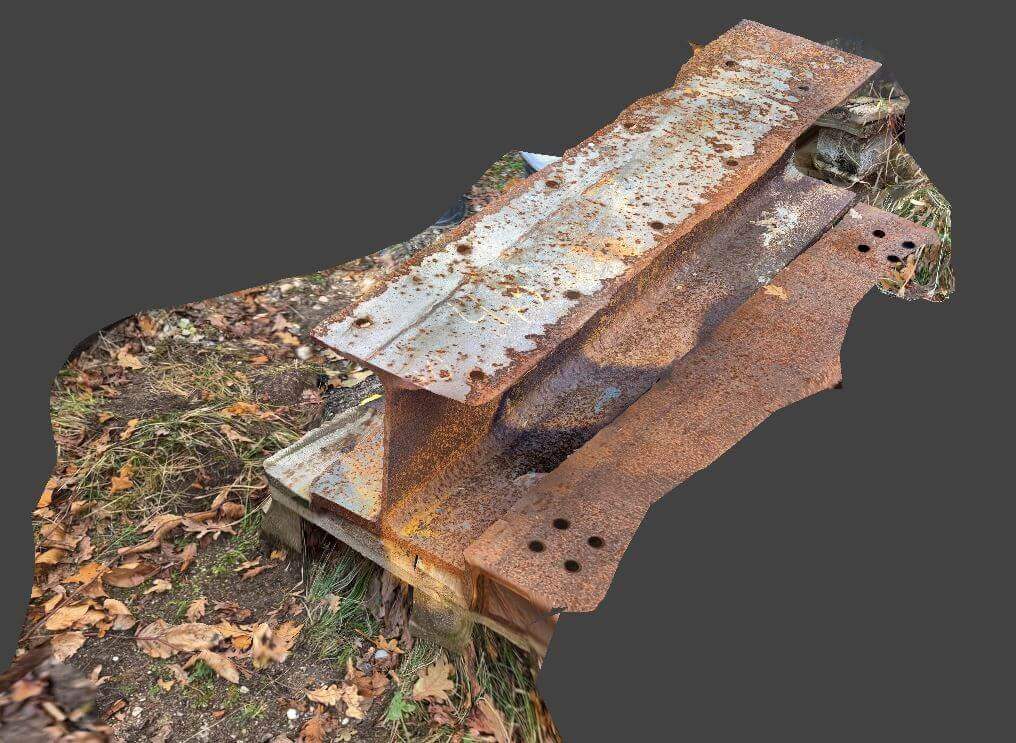
In the picture above, you can see that the grass on the ground and the beam next to the beam I am interested in, also get captured. However, I am not interested in that information.
It’s great that Scaniverse has a feature to crop the scan.
Now, to crop and rotate the scan, do the following:
- Open the 3D scan in Scaniverse
- Click on the EDIT button in the bottom
- Click on the CROP button in the bottom
- Rotate the Scan with the slider in the bottom
- Use the bounding box to crop your scan. This can be done for Top, Left, Front and Right view.
2. Export to many file formats
The variety of file formats that you can export to let’s you anything you want to do with the point cloud.
Your laser scans can be exported to:
- FBX
- OBJ
- GLB
- USDZ
- STL
- PLY
- LAS

3. Visualize your scans in AR
The objects that you scan can also be visualized in your surroundings in AR.
To do that, click on one of your scans and then on the AR View button in the bottom.
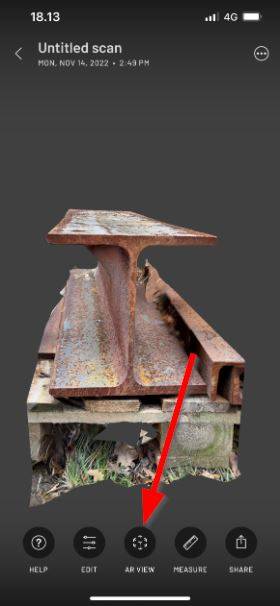
In the below example, I am visualizing the steel beam in my room.
Visualizing a beam in a small room has probably not a lot of value, but think of furnitures.
Before buying the furniture, you can actually check if the furniture fits into the flat.
4. Measure your objects
You don’t need a fancy 3D modelling software to get useful information out of the point cloud.
Scaniverse lets you actually measure the objects in the app – quite accurately.
In the picture below, I measured the width of my bed in the Scaniverse app because I knew it’s 90cm.
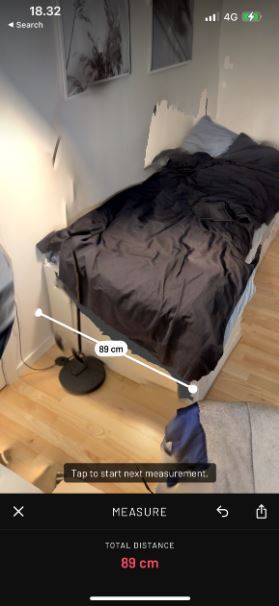
Not too bad, isn’t it?
Now, to measure, do the following:
- Open the 3D scan in Scaniverse
- Click on the MEASURE button in the bottom
- Click on 2 surfaces from which you want to measure the distance
5. Video of the 3D Scan
Check this out ⬇️⬇️⬇️
To do a video of your point cloud, do the following:
- Open the 3D scan in Scaniverse
- Click on SHARE at the bottom
- Click on Create Video
- Now you have plenty of features to create an amazing video
I am just thinking how helpful this feature actually is to landlords who want to rent out rooms.
With a video of the point cloud, potential renters can imagine the room much better.
Or what do you think? Let us know in the comments. ✍️
What I Like/Dislike About Scaniverse
Before we are diving into the pros and cons, it’s unbelievable to me that the App is for free.
Loads and loads of great features which don’t cost a penny as of January 2023.
OK, but now, let’s look at the pros and cons.
Like:
- Easy to use + great user interface
- Variety of export file formats
- Accuracy of a 3D scan of an iPhone
- Many great features to edit the point cloud afterwards
- Free app
Dislike:
- Accuracy drops when scan increases in size
- No red area doesn’t always mean that enough points were captured in that area
Conclusion
Who would have thought that we will do laser scans with our phones one day?
Overall, it’s a very impressive tool and as we discovered, the accuracy of the Scaniverse app is quite good.
I am very excited to see where this is going in the future.
But now, I’d like to hear from you, what are you using the LiDAR scanner for? And what do you think could be future use-cases of this? Let us know in the comments below. ✍️
If you are interested in tech and productivity for Engineering, then check out those articles: